How to Turn on Wifi on Hp Laptop
Z7_3054ICK0KGTE30AQO5O3KA30N0
hp-concentra-wrapper-portlet
![]() Actions
Actions
HP Notebook PCs - Setting Up a New Connection to a Wireless Local Area Network (Windows 7)
This document pertains to HP Notebook PCs with Windows 7.
A wireless or WiFi network provides all the functions of a wired network, while also giving you the flexibility to be in different locations within the radio-signal network. You can remain connected to the Internet, a printer, and share the network with more than one computer while enjoying the mobility of your notebook computer.
This document assumes that you have created a wireless home network as discussed in Creating a Wireless Home Network (Windows Vista), or you are trying to connect to a known working wireless network in a location that offers WIFI access for its customers.
Before you begin
Before you connect to a wireless network for the first time, you must have the following:
-
A Wireless adapter for the computer. This allows the computer to send and receive signals from the wireless router on the network. A wireless adapter is built into to most notebook computers and is identified by a wireless icon
 located on the front or side of the case, above the keyboard, or on one of the function keys. External wireless adapters that plug into the USB connection, or other device ports, are available for notebook and desktop computers not already equipped with an internal wireless adapter.
 -
Network name and security information. You need the name of the network (Service Set Identifier SSID), security type (WEP or WPA), and the security Key (passphrase). If you set up your home network, you have this information. On a public WIFI network, ask the provider for this information.
Setting up WiFi network for the first time
The first time you connect to a specific WiFi network, you must enter all the configuration information to establish the connection. You can configure the computer to automatically connect when the computer is within range of the network. Follow the steps below to set up your WiFi connection.
note:The original factory image of the HP computer has the required drivers for the built-in wireless network device and the HP Wireless Assistant. If you have changed the operating system (OS), download and install the latest version of the wireless network device driver and the HP Wireless Assistant for your model and OS. Not all computers have a built-in wireless device.
If the computer does not have an HP factory image, you may want to search www.google.com or www.youtube.com for information on setting up a wireless network.
-
Start the computer, and turn on the wireless device.
To turn on the wireless device, simply move the switch to the On position. The power switch for the wireless LAN device, and the Bluetooth device (if equipped), is located on the side of the case or above the keyboard depending on the model. On some computers, the switch is actually a touch point on the panel above the keyboard or on one of the function keys.
For most computers, there is an LED light
 that glows blue when the wireless device is turned on and enabled, and glows orange when off or disabled. Some newer models use a different color scheme and have an LED built into the corresponding function key.
 -
In the toolbar notification area, locate the HP Wireless Assistant icon.
-
If it is On
 , continue to the next step.
 -
If it is Off
 , right-click the icon and select Open Wireless Assistant. Click Turn On to enable the device.
 -
If there is no icon, click Start, type hp wireless assistant into the Search field, and then click HP Wireless Assistant in the search results. Turn On (enable) the wireless device.
If the HP Wireless Assistant is not listed in the search results, use another computer to download it from the Drivers and Download page for your HP product.
-
-
Now that the wireless device is turned On and Enabled, locate the available wireless networks icon
 in the toolbar notification area. If there is no wireless icon, but the network cable is connected, unplug the network cable. The wireless network icon will display.
 -
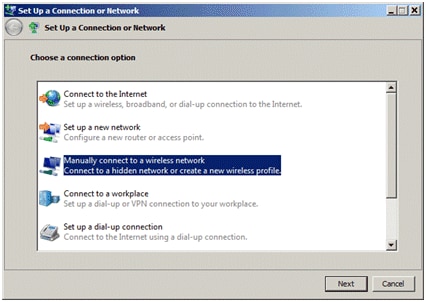
Right-click the wireless network icon, click Open Network and Sharing Center, click Set up a new connection or network, and then select Manually connect to a wireless network.
Figure : Set up a connection or network
-
Click Next to continue.
-
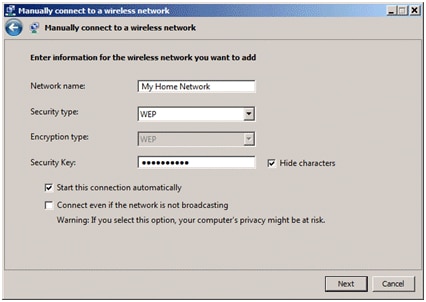
Enter the required network security information. This is the information you used when you set up your home network.
Figure : Manually connect to a wireless network
-
Network Name (SSID)
-
Security type (WEP and WPA are common types)
-
Encryption type (Additional feature of some types of security)
-
Security key or passphrase
-
Start this connection automatically Select this option if you want the computer to automatically log on when it is in range of the wireless network.
-
-
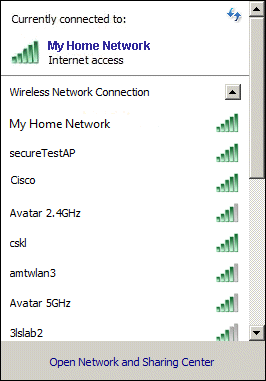
To verify the wireless connection is complete, click the available network icon to display a list of available wireless networks.
Figure : Available wireless networks
Reconnecting to an existing network
After you have set up a connection to your home network, or a public WIFI network, you can reconnect to that network at a later time.
If, during the original setup, you selected the Start this connection automatically option, the network connection will be made, using the values entered during the setup, when you bring your computer into the range of existing wireless network.
If you did not select the automatic connection option, do the following when the computer is within the range of the wireless network.
-
Turn the wireless device power on
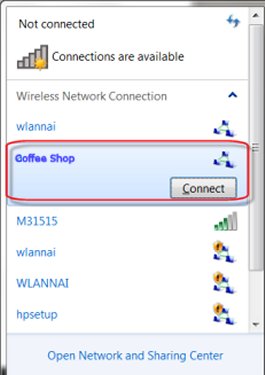
, and then click the network icon in the toolbar to display a list of available wireless networks. -
Select the desired network, and click Connect.
Figure : Available wireless networks
-
When prompted, enter the Security key or passphrase.
Managing your wireless network connection
If you have problems re-connecting to a network, or if you need to change some of the settings, such as the password, follow these steps to open the Network and Sharing Center.
-
Click the network icon
 in the task bar and click Open Network and Sharing Center.
 -
Click Manage Wireless Networks in the left pane of the Network and Sharing Center window.
-
Select the network you want to manage, right-click, and then select Properties.
Figure : Manage wireless networks

-
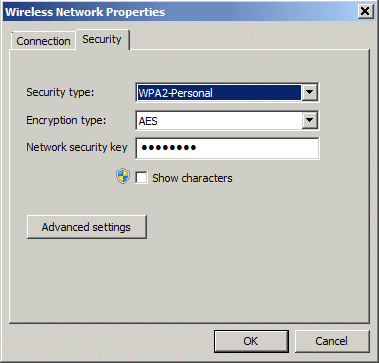
You can change values such as protection type and passphrase on the Security tab. When you have finished managing your settings, click OK
Figure : Wireless network properties security tab
How to Turn on Wifi on Hp Laptop
Source: https://support.hp.com/id-en/document/c01884605